Monday, June 2, 2014

Summer Changes :)

As usual, we have been working really hard.  I wanted to start with some of the projects I talked about in past posts.  Here is the finished flower bed.  Some of the plants are from other places in the yard, some are from friends and family, some are from the farmers' market.  I think it turned out really well.  I hope all the plants like the shady area.


I also had talked about how I was making lanterns with the jam jars from the garage sale, and here they are.  I haven't lit them yet, but I think they look really cute in the flower beds.

I crafted these spring decorations for the living room months ago, and they have been out, but it was time to make some changes for summer.


Here are some of my craft projects for the summer living room:


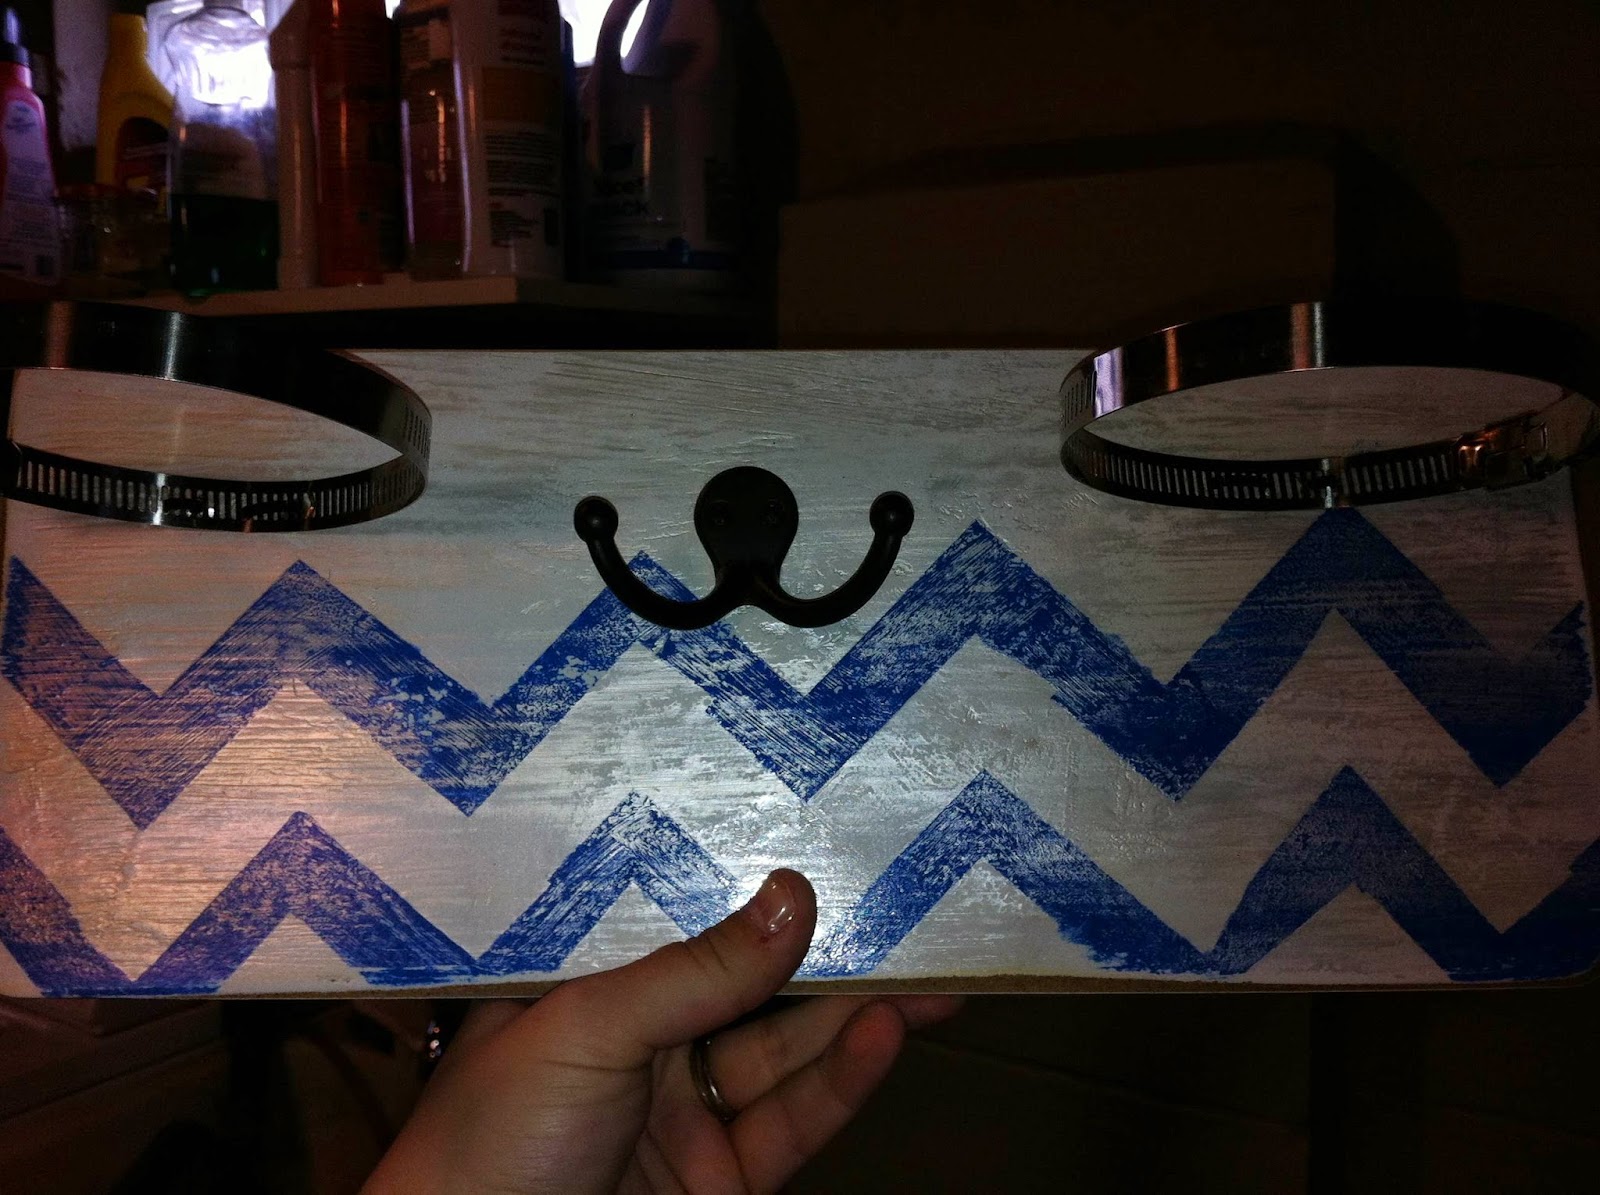
I also cut these letters out of some wood that we had.  We have three different doors in the hallway that all look alike so I thought this was a cute way to differentiate which one was the bathroom for our guests.

I always change the front door decoration for the season, but I didn't have a good one for summer that wasn't holiday themed so I made one here.  I got inspiration from Pinterest, and then took some wood that we had left over from the kitchen banquet project and cut out the shape.  I decided to paint it kind of like pinstripes.

Here is the finished product.  I LOVE it! The most expensive thing was the flower, and I got that in the $1 section of Michaels.  The wood was extra that I had, the paint is my favorite Zinsser, the beige paint is actually spray paint left over from painting the rain barrel, and the rest of scrapbook paper.  I even had the black ribbon from my sister-in-law.  I think it looks great, and it cost me under $2 :) I love a barg.

The last project was curtains in the living room.  It was the last room without curtains so I had been looking all over for a set.  Curtain panels are more expensive than I would like so I spent a while looking around.  I finally got a set off of Groupon that I don't absolutely love, but I certainly don't hate either.  Eric put up the curtain rods so we can always switch them out if I see something else that I like more.  I think that curtains just finish a room so overall, I'm super happy with how they turned out.


Wednesday, May 28, 2014

Spring has Sprung!!!

It has been forever, but we have been super busy as you will see throughout the post.  We also have had really exciting news! I am now ABD, which is a great relief, and Eric passed his P.E. exam so now he is officially Eric Krieg, P.E. (Professional engineer).  The first change we made was that we added these two pieces to the wall in the kitchen.  I had a post about the plates earlier, and Chrissie went to Spain and brought us back these address tiles, and she gave us a Pewabic tile in the shape of Michigan.  We think that they look great! I love seeing them everyday!


 Our next project was to replace the path in the backyard.  We assumed it was going to be a lot of work, but it was that and so much more.  We had two people come help us, and it still took a couple days.  To get from the garage to the side door of the house, we had to walk through the backyard, which has some low spots.  We were always tracking things into the house so we definitely knew that we needed to replace the path.  Here is it before:

This is the concrete pieces that made up the path before.  They were really uneven and our inspector called them "trip hazards" so they had to come out.  

Here are the materials that the landscaping company dropped in the driveway.


The start of a 10" deep trench that goes across the entire backyard


The finished project!!!!!!!!! Yay! It looks great! We couldn't be happier with the path!


Like the fools that we are, we decided to add more to the path.  There was nothing going from the gate into the yard to the path so you would have to walk through the yard anyway.  We had extra material and the knowledge to do it now so we went for it.  Once again, it was miserable...


Once again though, it turned out great!

Here are some of the other projects. This flower bed had nothing in it so it is now filled.  I did all of this on a budget so it either came from family and friends or the clearance rack at Lowe's or Home Depot.

Herb garden :)

Rain Barrel! I made this during a workshop in Detroit that was put together by the Riverfront Conservancy, Sierra Club, and Maxi Container. It was a beautiful day on the Detroit River, where they brought everything you needed and you built the barrel.  I also spray painted mine when I got home.  Now it's in the backyard collecting water for my pots :)

 Garage sale purchase!


More plants in the bed by the house :)

I really wanted a fiirepit, but I wasn't sure that we were allowed to have them. All of the neighbors have little portable ones so I looked at them at the store, but I was not willing to pay $50 for it.  Of course, my next step was Google  I found these sites that had a great idea: http://www.theflourishingabode.com/2012/06/diy-metal-fire-pit-tutorial-hack-challenge-finale.html and http://www.macho.co/diy-make-your-own-firepit/

I called a local home appliance store, and they sold me this for $10.  It's the inner drum of a washing machine. $10! What a barg!

I cleaned it and sprayed it with heat resistant spray paint.

Put legs on it.  These are the struts that people use to put shelving up on walls.  It is just bolted through the holes that were already in the drum.

Then we enjoyed :) Here's our first bonfire in Zoltan (Yes, we named it)


Next projects: I bought this old jam jars at a garage sale, and I'm going to make them lanterns to put in the flower beds. I like that they seal so rain won't just collect in them.

 I am working on this last flower bed too.  It wasn't there originally, but with the paths, I think that it will look really nice. The grass wasn't growing underneath anyway so I'm planting shade friendly plants to make it look nice.

Lastly, I am making a flower box for the window on the garage.  You can see the window I'm talking about in some of the pictures above.  I think it should brighten up the beige.  I'll keep you posted on all of the projects! This is it... for now!


Monday, April 21, 2014

Spring Cleaning!

Hey! I've been really busy with school so I haven't posted in a while.  I've made some small changes around the house that really help! Here they are:

We have a really little kitchen with very little counter space, and our coffee maker was taking up a lot of that precious space.  My friend gave me this kitchen cart because she didn't need it in her new place, and it is a great fit for our space. The black color was a little harsh for me, but I knew a little spray paint can work wonders.


My inspiration: Although, this one has really cool shaped wire baskets.


So I tried spray painting it during the winter in the basement with the windows open.  Worst idea ever. I don't even want to know how many brain cells I killed off. Lol. Downstairs wasn't bad at all, but I came upstairs and some of the fumes got up there, even with the door shut.  Eric and I both ended up with little headaches so we opened the windows through the upstairs, even though it was the middle of winter and freezing cold.  Obviously, not my proudest moment.  Thank god Eric was understanding :)

Anyway, here is the finished product.  I made these little tags with some of my leftover wainscoting from the bench and some scrapbook paper.  The cart is the perfect place for our coffee mugs and for the dish towels and rags.  It isn't perfect, but it certainly does the job for now :)


My next project was a way to keep all the dogs' things in one place.  I took inspiration from Pinterest and all of those bathroom organizers that people put Q-tips, cotton balls, etc. in.  The project cost under $5 and is a perfect place by the door.  I started with a random sign that I wasn't doing anything with.  I took the hooks out of it and sanded it down so the colors didn't bleed through.


I used duct clamps (less than $1 a piece) and attached them to the to the board after I painted it the way I wanted.  All the blogs online said that they screwed the clamp to the board, but I couldn't get my drill to go through it so I got creative and zip-tied them to the board.  I wouldn't recommend this if the things you are trying to hang are heavy, but I knew mine weren't, so it worked.


I also attached a double hook in the middle so we can hang both of the leashes.


Lastly, I went to the dollar store and looked for a container to hang in clamps.  A lot of people used mason jars, and I thought that was cute, but this is right by our door, and I didn't want glass just in case someone bumps it when they are coming it.  I found these cute plastic containers for $1 each, and they are the perfect fit.  One side has poop bags and the other has treats, and the leashes hang just right.  For under $5, I made this perfect storage system, which helped us have things close by when we need them, and it got things out of the kitchen.


We have lots of landscaping projects coming up so I'll keep you posted on them!